Story + Scripting
Drafting a story and scripting out the dialogue is the first step in the process. I typically write 2-3 'narrative' drafts of the chapter, written in the style of a short story or novel. I refine this draft until I'm happy with the content, the style of writing isn't particularly important as long as I can communicate the key ideas. From there I organize all the dialogue from the draft into a script style, this is what I'll use to plan out the pages.
Thumbnailing + Compositions
After the script is written I begin planning out the composition of the pages. I do this by creating small sketches to plan out the composition and flow of the page, this process is called thumbnailing. It typically takes a few days to finalize the composition, but even after I finish the pages are subject to change.

Thumbnail page for Chapter 3. I'll be focusing on page 18 for this example.

Scroll
Sketching
Once I finish the compositions and script for all the pages I move on to actually creating the pages. First I take my thumbnail sketch and blow it up to the proper page size, making sure that all the important parts of the page are within the live area (this is the area on the page that will definitely be printed should I choose to create a hard copy). From there I put in the comic panels and sketch the entire page. I'll use this sketch to put in the clean lines later on.


Sketch passes 1 & 2 for page 18.
Lineart
Once I have a clean sketch I'll go over with a clean black line, this is called the lineart. The lineart process is a simple step, but it takes the longest because I want the lines to be smooth but still dynamic.

Lineart for page 18
Flat Colors
This step is also fairly simple. For recurring characters I have a color reference that I use to keep their colors consistent, skin, hair, clothing, etc. I use the paint bucket tool to fill large areas of color and the pen tool to clean up any areas that might have been left blank. The difficult part can come from harmonizing the colors of the characters with the colors of the background. I typically use monochromatic color schemes for the background to avoid having too many clashing colors that might distract from the characters on the page.
The color process usually goes by quickly, but can become time consuming if I'm struggling to make the page look harmonious. If I'm having this problem the best solution is to take a break and come back to the page later with fresh eyes.

Flat colors for page 18
Rendering
The rendering step includes shading and highlighting both the characters and background. I'll adjust the color of my shading depending on the mood of the scene, for standard scenes I shade by using a slightly darkened and more saturated version of the flat color and also adjust the color slightly. For example, if I am shading a green object I will use a slightly darkened greenish blue for the shadows.
After I shade the characters I shade the background, my backgrounds are usually less involved than the foregrounds and I make use of my programs layer properties, like a multiply layer, to shade the background in the color I want.
Unless I'm drawing a scene with a harsh light source I tend to only highlight the hair and eyes. However for more intense or dramatic scenes I might add some additional highlights.
Rendering for page 18
Dialogue + Last Touches
Once the page has been fully colored and rendered I add any remaining details that will complete the page. This includes word bubbles and text as well as any effect lines or onomatopoeias. After this I look over the page one last time to make sure there are no errors. Then I save the page as a png and start the process again for the next page.

Printing
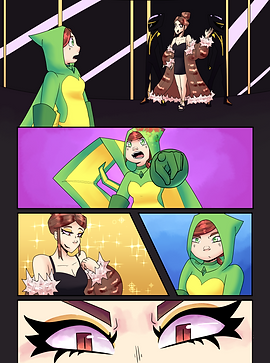
Completed page 18
After completing a chapters worth of pages, usually ranging from 20-25 pages, I will have them printed and assembled into a comic book. At first this process was incredibly difficult, I couldn't find a service that would print small quantities of books and I had neglected to include a live area in my first chapter so had to go back and edit the pages to make sure important details weren't being cut off. I eventually found a suitable printing service and was able to create hard copies of my work.
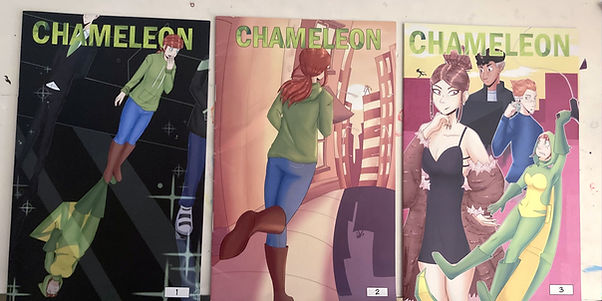
Printed versions of chapters 1-3